TPP Tutorial
Introduction
Trans-Proteomic Pipeline Overview
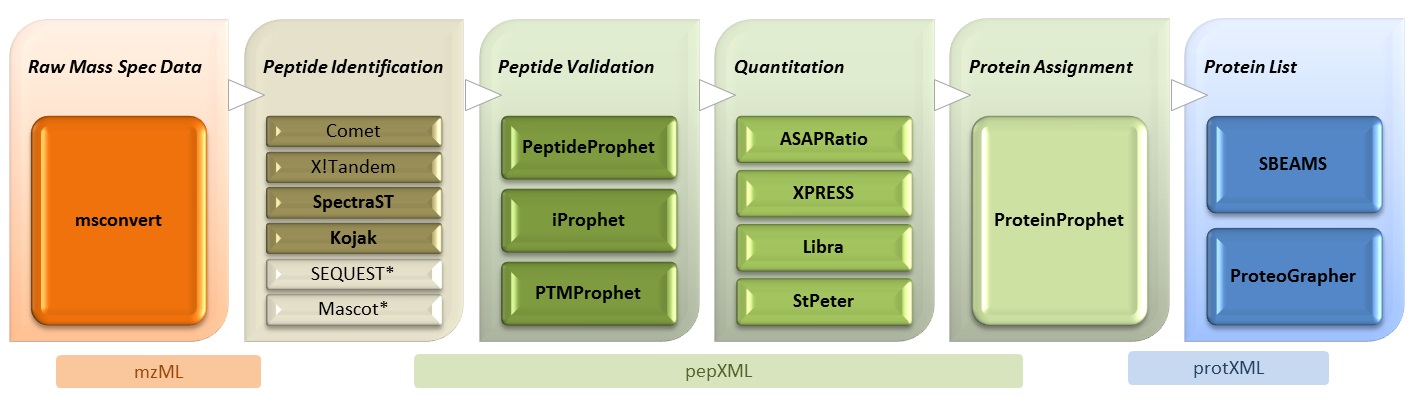
Commercial software not part of TPP*
About Tutorial
This tutorial is written for anyone who has a general interest in learning about one method to identify and quantify peptides and proteins using mass spectrometry. We have attempted to write this tutorial so that the user does not need an extraordinary knowledge of proteomics, biology, chemistry, mass spectrometry, or software engineering. Also, this tutorial does not require any software or data that is not easily available on the web and it does not require any previous experience with the analysis of mass spectrometric data. This tutorial should also be of use to those who are very familiar with proteomics data analysis but do not have a great deal of experience with TPP.
System Requirements and TPP Versions
Quick Start to data analysis using the TPP
1. Download and install the TPP
To install on your Windows system, please follow our Windows Installation Guide, making sure that you select to download the the latest version of TPP from our Sourceforge download site.
Log into Petunia, the TPP GUI
As a way to verify that the installation was successful, log into Petunia by double-clicking on the Trans-Proteomic Pipeline flower icon on your Desktop or through the Start menu. Alternatively, you can open a browser window into the following URL: http://localhost/tpp-bin/tpp_gui.pl . You can use the credentials guest and guest as user name and password to log in.
Once you are in the Home page, please select Tandem as the analysis pipeline, just below the Welcome message.
2. Download and install the test data and database
For this demo, we will be using a SILAC-labeled Yeast dataset, comprised of 2 runs on a high mass-accuracy Orbitrap instrument, along with a Yeast database appended with decoys. We also include a search parameters file.
- If you would like to start the pipeline with the conversion of the vendor's raw data format to the open mzML format, you will need to have chosen to install the msconvert component when installing TPP. You can then download the raw demo data as a zip file (309Mb) and unzip (you can obtain a free unzip utility, such as 7zip, from the web). You should find 2 files.
- If you would rather skip this conversion step, please download the pre-converted mzML files (768Mb) and unzip.
- Lastly, download the parameters and database files (2.1Mb) and unzip.
- Copy or move the yeast_orfs_all_REV.20060126.short.fasta file into the folder C:\Inetpub\wwwroot\ISB\data\dbase
- Copy or move the two data files (OR20080317_S_SILAC-LH_1-1_01.raw and OR20080317_S_SILAC-LH_1-1_11.raw) -- or the .mzML files if that is what you downloaded -- as well as the tandem parameters file tandem.params into the folder C:\Inetpub\wwwroot\ISB\data\demo\tandem . Create this last folder if necessary.
Please note that this tutorial assumes that you are running a default TPP installation on a Windows system; if you are using a different system, please adjust the parameters files and file locations accordingly.
3. Convert raw data to the mzML format
We have developed the TPP (and dozens of related tools) to read mass-spec data from a common, open data format. We must therefore first convert the proprietary raw data to this format, called mzML.
-
- If you downloaded the mzML files directly in step 2, skip to step 4.
- Mouse-over the Analysis Pipeline (Tandem) portion of the navigation links near the top of the Petunia page; a pop-up menu should appear. Select the mzML/mzXML item in this menu.
- Make sure the option Thermo RAW is selected as the instrument type you want to convert
- Click on the Add Files button in the first section; the File Chooser window will open.
- Click on the demo directory link on the right portion of the page. Then select tandem.
- Select both raw data files by clicking on the checkbox next to each, then on the Select button at the bottom. This should return you to the mzML page along with a confirmation of the files that you just selected.
- Leave the Conversion Options unchecked.
- Click on Convert to mzML; a wait page should appear. It takes up to 30mins to convert two files; maybe only 5min if you have a fast new machine.
- The Command Status box should automatically change color to orange when the conversions are done.
4. Search data with X!Tandem
A custom version of the popular open-source search engine X!Tandem is bundled and installed with the TPP. It has been modified from the original distribution by adding the K-Score scoring function, developed by a team at the Fred Hutchinson Cancer Research Center.
- First, make sure that Tandem is selected as the analysis pipeline.
- Click the Database Search tab under Analysis Pipeline to access the X!Tandem search interface.
- Under Specify mzXML Input Files, click Add Files and select the two mzML files present in the demo\tandem directory as input files for database searching.
- Similarly, under Specify Tandem Parameters File choose the Tandem parameters file called tandem.params located in the same directory.
- This file defines the database search parameters that override the full set of default settings referenced in the file isb_default_input.
- In this example, the mass tolerance is set to -2.1 Da to 4.1 Da, a fixed residue modification mass is set to 57.021464@C, and the variable modification masses are set to 15.994915@M,8.014199@K,10.008269@R -- i.e. oxidized Methionine, and SILAC modifications on Lysine and Arginine. A wide mass tolerance is used to include all the spectra with precursor m/z off by one or more isotopic separations; the high accuracy achieved by the instrument is then modeled by PeptideProphet with the accurate mass model.
- For more information, please go to TANDEM
- Next, select a sequence database to search against. Navigate up to the dbase directory in the File Chooser, and select the database file yeast_orfs_all_REV.20060126.short.fasta.
- Lastly, start the search by clicking on the Run Tandem Search button.
5. Search data with SpectraST
SpectraST is a search engine that compares acquired spectra against a library of pre-identified spectra to which peptide sequences have been assigned. In order to conduct the search, we must first download the appropriate spectral library.
- Go to the Home page, and switch the pipeline type to SpectraST.
- Under the SpectraST Tools section of the navigation menu, select the Download Spectral Libraries menu item.
- You are now at at page that shows a list of spectral libraries available at PeptideAtlas, along with locally-installed/downloaded ones. Select the NIST_yeast_IT_v2.0_2008-07-11.splib.zip (yeast ion trap) library on the right pane, and click on Download Selected Libraries.
We also need to copy the mzML data files we converted in step 4 into the SpectraST data area. While this can be accomplished within Petunia, it is easier to use Windows file copy. Copy the two mzML files located at C:\Inetpub\wwwroot\ISB\data\demo\tandem into the directory C:\Inetpub\wwwroot\ISB\data\demo\spectrast (which you will need to create). Now we can move on to searching these data:
- Mouse-over the Analysis Pipeline menu title in Petunia, and then click on the SpectraST Search menu item to access the SpectraST search interface.
- In section 1, select the two mzML data files under demo\spectrast and click Add Files.
- For section 2, select the NIST_yeast_IT_2012-04-06_7AA.splib.zip spectral library file located under dbase\speclibs. This is the file you downloaded from PeptideAtlas above.
- Finally, for section 3, select the yeast_orfs_all_REV.20060126.short.fasta sequence database, located under dbase.
- Leave the rest of the options on the page at their default values, and click on Run SpectraST to initiate the search.
6. Validation of Peptide-Spectrum assignments with PeptideProphet
PeptideProphet provides statistical validation of search engine results by assigning a probability to each peptide-spectrum match.
- Click on the Analyze Peptides tab under the Analysis Pipeline section in Petunia to access the xinteract interface.
xinteract is a general utility that is able to launch several components of the TPP, including PeptideProphet.
- Select the two OR2008*.pep.xml files in the directory demo\tandem. Make sure that there are only two files selected for analysis; you can edit the selections using the checkboxes and Remove button on the right-hand side.
- Under PeptideProphet Options, find and select the option to Use accurate mass binning since this is a high-accuracy data.
- Leave all other options set to their defaults, and click on Run XInteract at the bottom of the page to run PeptideProphet.
- Once the command finishes running, you can click on the view
results link that appears in the Command Status box to
view and analyze the results. IMG:PepProphet
- On this page, sort the list in descending order based on probability. The identifications at the top of the resulting list are most likely to be correct.
- Click on the hypertext link for any probability. This brings up a details page IMG:PepModels which shows graphically how successful the modeling was. In the upper pane, it is desirable for the green curve (sensitivity) to hug the upper right corner, and for the red curve (error) to hug the lower left corner. The lower pane shows how well the data (black line) follows the PeptideProphet modeling for each charge state. The red curve describes the modeling of the negative results, and the green one, the positive results. If these two curves are well separated and fit the black line well, then the analysis for that charge state was successful.


- You can now run this analysis separately on the SpectraST results. Make sure you are only analyzing the two input files located under the demo\spectrast directory (remove all other input files).
7. Visualize LC-MS/MS data using Pep3D
Pep3D is a tool for visualizing LC MS data, along with results from PeptideProphet.
- Under the Files -> Browse Files section in Petunia, navigate to the demo\tandem directory. (nB. you may already be in that directory.) You may also select the interact.pep.xml file under the spectrast folder.
- Open the PeptideProphet results file by clicking on the [ PepXML ] link next to the file named interact.pep.xml. This will launch the PepXMLViewer application.
- Click on the Other Actions top-level tab, and then on the Generate Pep3D button. A new window will launch the Pep3D viewer.
- Leave the default options (or change to taste) and click on the Generate Pep3D Image button.
- After a few moments, you should see two images displayed on the page, one per mzML input file. IMG:Pep3D

8. Further peptide-level validation iProphet
- iProphet (or InterProphet) is a tool that provides statistical refinement of PeptidePropet results.
- Click on the Combine Analyses tab under the Analysis Pipeline section in Petunia to access the iProphet interface.
- Select the interact.pep.xml file in the directory demo\tandem, as well as the file of the same name under the demo\spectrast directory. Make sure that there are two files selected for analysis; you can edit the selections using the checkboxes and Remove button on the right-hand side.
- Under Output File and Location, make sure that the File path (folder) is set to c:/Inetpub/wwwroot/ISB/data/demo. You may have to edit out part of the default value that is first shown.
- Leave all other options set to their defaults, and click on Run InterProphet at the bottom of the page to run iProphet.
- Once the command finishes running, you can click on the view results link that appears in the Command Status box to view and analyze the results. IMG:iprophet

9. Peptide Quantitation with ASAPRatio
- ASAPRatio is a tool for measuring relative expression levels of peptides and proteins from isotopically-labeled samples (e.g. ICAT, SILAC, etc).
- Click on the Analyze Peptides tab under the Analysis Pipeline section in Petunia to access the xinteract interface again.
- Select the interact.ipro.pep.xml file in the directory demo. Make sure that there is only one file selected for analysis; you can edit the selections using the checkboxes and Remove button on the right-hand side.
- Important
- Under Output and Filter Options, change "Write output to file:" to have the same name as the input file, interact.ipro.pep.xml
- Under PeptideProphet Options
- Make sure that you uncheck the option to RUN PeptideProphet
-
Under "Enter additional options to pass directly to the command-line
(expert use only!)", enter the text:
-nI
- Under ASAPRatio Options
- select to RUN ASAPRatio, change Labeled Residues to K and R
- set m/z range to include in summation of peak to 0.05
- set Specified masses to M 147.035, K 136.10916, and R 166.10941
- Leave all other options set to their defaults, and click on Run XInteract at the bottom of the page to run ASAPRatio.
- Once the command finishes running (about 4 hrs), you can click on the view results link that appears in the Command Status box to view and analyze the results. The “asapratio” column contains quantitation results with a link to the ASAPRatio ion trace. The number listed in the “asapratio” column is the light to heavy ratio. IMG:ASAPRatioProfiles

10. Protein-level validation with ProteinProphet
ProteinProphet is a tool that provides statistical validation of Protein identifications, and is based on PeptideProphet or iProphet results.
- Click on the Analyze Proteins tab under the Analysis Pipeline section in Petunia to access the ProteinProphet interface.
- Select the interact.ipro.pep.xml file in the directory demo. Make sure that there is only one file selected for analysis; you can edit the selections using the checkboxes and Remove button on the right-hand side.
- Optional (feel free to leave either or both of these
options unused) :
- check the Input is from iProphet box to calculate protein probabilities based on the iProphet results (default is to use the PeptideProphet results).
- check the Import ASAPRatio protein ratios and pvalues box to also calculate protein-level expression, based on the ASAPRatio results at the peptide level. (n.B. this greatly extends the time it takes to complete this step.)
- Leave all other options set to their defaults, and click on Run ProteinProphet at the bottom of the page to run ProteinProphet.
- Once the command finishes running, you can click on the view results link that appears in the Command Status box to view and analyze the results. Protein groups are sorted in descending order by Probability so that the groups at the top of the page are the most confident identifications. The protein probabilities are the red numbers listed next to each protein group. IMG:Protxml

11. reSpect your Results
reSpect is a tool that allows you to identify even more peptides from your existing spectra without collecting anymore data. It can help boost identification rates for low abundance ionic species in datasets containing chimeric spectra.
- for more info see the reSpect Page
Other Resources
- You can find a longer, more thorough (but older) tutorial at the TPP Tutorial v1 page of our Wiki.