TPP Tandem search
From SPCTools
←Older revision | Newer revision→
Performing XTandem search using the Trans Proteomic Pipeline (TPP) Tutorial
TPP V4.0.2, 2008. Note: Screenshots may vary from the TPP build you are using because the application is in development.
This document was originally assembled by Lik Wee Lee of ISB. It extends and uses some material from this earlier TPP Tutorial.
Contents |
Introduction
This tutorial will cover the application of the Trans Proteomic Pipeline (TPP) to do a database search of acquired MS/MS spectra using X!Tandem. The data used in this tutorial comes from this TPP Tutorial. The TPP Tutorial begins with passing the results from a SEQUEST search through TPP in order to statistically evaluate and quantify the proteins identified. This tutorial on the other hand will cover omitted steps: using TPP to perform a database search. The search engine X!Tandem will be used in this tutorial as it has two advantages: 1) no commercial license is needed to use the software 2) distributed with the TPP installation.
Systems Requirements
This tutorial requires that TPP be installed. TPP is distributed for both Linux and Windows platform, however this tutorial will focus on the Window platform. Since the graphical interface of TPP ( Petunia) is through a web browser, either Internet Explorer or Firefox is required. Although the search engine X!Tandem is required, no separate installation is needed as it will be installed as part of the TPP installation. The TPP installer can be found at sourceforge. The current version (at the time this was written) is 4.0.2.
Download the installer: TPP_Setup_v4_0_JETSTREAM_rev_2.exe. Run it and follow the installation instructions.
The mass spectrometer data is provided in mzXML format and can be downloaded via www.insilicos.com/spctools/data/tutorial_wiki.exe.
mzXML is a instrument independent data format and the rationale is to provide a standard format that can used by various data analysis software like TPP. Various proprietary and raw file format from mass spectrometer vendors can be converted to mzXML.
Getting Started
Donwloading and installing the TPP
Information on installing and downloading the Windows distribution of TPP can be found at: sourceforge
Setting up an account
The TPP GUI comes with one user account. This account has ‘guest’ as both the user name and password. It is useful to create another account for this tutorial.
Open the DOS shell by selecting Run under the Start menue and typing cmd. In the shell type:
cd c:\Inetpub\tpp-bin\users\
mkdir tandem
cd tandem
crypt isbTPPspc TPP > .password
and
chmod -R 777 C:\Inetpub\tpp-bin\users\tandem
You have just created the password ‘TPP’ for the user ‘tandem.’
In order to add a different username, create a tpp-bin/users/NEWUSER/ directory and run crypt isbTPPspc NEWPASSWORD > .password from this directory. In these examples "isbTPPspc" is the crypt key. This can be changed.
Getting the tutorial data
Unzip the tutorial data into the directory:
C:\Inetpub\wwwroot\ISB\data\Tandem_Tutorial
This directory will now contain 6 mzXML file: raft4041.mzXML, raft4243.mzXML, ... , raft5051.mzXML and a sequest.params file.
There is also a directory named dbase, with subdirectory IPI containing the database file ipi.HUMAN.fasta.v2.31.
Running X!Tandem
Opening the GUI
The TPP pipeline GUI can be opened by clicking on the ‘TPP Web Tools’ shortcut that was created on your desktop during installation or by selecting “TPP Web Tools” under “TPP” in the Windows start menu. Alternatively, you can click on the following link or open your favorite web browser and paste this link into the navigation bar:
http://localhost/tpp-bin/tpp_gui.pl
Login as ‘tandem’ and use ‘TPP’ as the password.
This tutorial is written from the point of view of a researcher viewing data on the computer where the TPP tools are running.
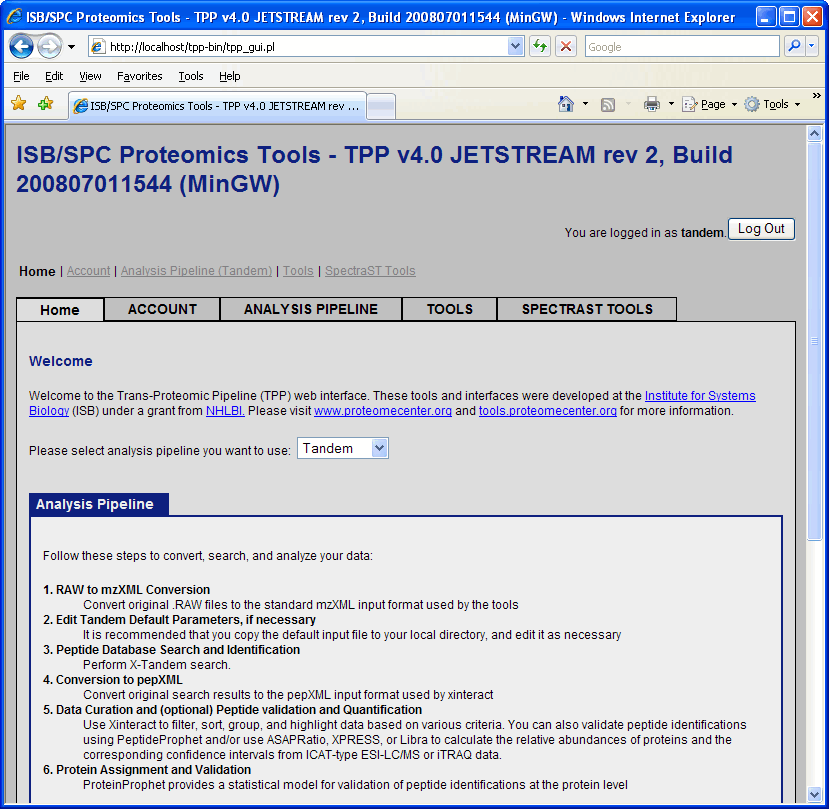
At this point you will be in the “Home” tab of the proteomics pipeline GUI. The Home tab contains information about TPP and the structure of the GUI, along with a pull down menu that lets you choose between SEQUEST, Mascot, Tandem or SpectraST. The default is SEQUEST. Click and change this to Tandem.
Database search using X!Tandem
Click on “Analysis Pipeline”. This will display six tabs which activate different parts of the pipeline. The first tab is Home, which contains information about the TPP. The second and third tab is used to convert raw data from different spectrometers into mzXML and mzML, and the fourth tab is used to search the ms data which is our immediate goal. Click on the “Database Search” tab.
Configuring X!Tandem parameters
The ms data has already been searched using Sequest. We would like to perform a similar search using X!Tandem through the TPP interface. To do this, we should take into account the relevant static and variable modifications. The following lines in the sequest.params tells us these:
diff_search_options = 8.0 C 0.0 x 16.0 M

add_C_Cysteine = 442.2000                ; added to C - avg. 103.1388, mono. 103.00919
Note that the sample data were ICAT labeled (Old-ICAT, light tag = d0 442, heavy tag = d8 450). This modifies adds to 442.2 Da to cysteine. Due to the presence of the isotope deuterium, the heavy tag would have an additional 8 Da over the light tag. This accounts for the 8.0 C in the variable modification parameter of SEQUEST (diff_search_options). The 16.0 M accounts for the presence of oxidized methionine.
Our X!Tandem parameters would contain the corresponding line:
<note type="input" label="residue, modification mass">442.2000@C</note>
<note type="input" label="residue, potential modification mass">8.0@C,16.0@M</note>
Note: There is a bug in TPP 4.0.2 regarding the _DEFAULT_INPUT_LOCATION_ string in the default tandem_params.xml (c:\Inetpub\wwwroot\ISB\data\parameters\tandem_params.xml). This is fixed in the next release TPP 4.1.0.
Creating your custom tandem.params.xml
Copy the file tandem.params.xml in the directory C:\Inetpub\wwwroot\ISB\data\parameters to the directory C:\Inetpub\wwwroot\ISB\data\Tandem_Tutorial.
Edit the file C:\Inetpub\wwwroot\ISB\data\Tandem_Tutorial\tandem.params.xml and make the following changes.
The following lines are to be deleted from the default tandem_params.xml as these will be inserted by the TPP
graphical interface (Petunia):
<note type="input" label="spectrum, path">full_mzXML_filepath</note>
<note type="input" label="output, path">full_tandem_output_path</note>
<note type="input" label="list path, taxonomy information">_DEFAULT_INPUT_LOCATION_/taxonomy.xml</note>
<note type="input" label="protein, taxon">protein_database</note>
Note: if you are running X!Tandem through the command line, you would need to configure these three lines appropriately instead of deleting them.
The following lines are modified from the default tandem_params.xml:
<note type="input" label="list path, default parameters">c:/Inetpub/wwwroot/ISB/data/parameters/isb_default_input_kscore.xml</note>
<note type="input" label="residue, modification mass">442.2000@C</note>
<note type="input" label="residue, potential modification mass">8.0@C,16@M</note>
<note type="input" label="refine">yes</note>
<note type="input" label="refine, modification mass">442.2000@C</note>
<note type="input" label="refine, potential modification mass">8.0@C,16.0@M</note>
They would have originally read:
<note type="input" label="list path, default parameters">_DEFAULT_INPUT_LOCATION_/isb_default_input_kscore.xml</note>
<note type="input" label="residue, modification mass">57.021464@C</note>
<note type="input" label="residue, potential modification mass">15.994915@M</note>
<note type="input" label="refine">no</note>
<note type="input" label="refine, modification mass">57.012@C</note>
<note type="input" label="refine, potential modification mass">15.994915@M</note>
The final version of C:\Inetpub\wwwroot\ISB\data\Tandem_Tutorial\tandem.params.xml would look like this:
<?xml version="1.0" encoding="UTF-8"?>

<bioml>

<note> DEFAULT PARAMETERS. The value of "isb_default_input_kscore.xml" is recommended.
Change to "isb_default_input_native.xml" for native X!Tandem scoring.</note>
	<note type="input" label="list path, default parameters">c:/Inetpub/wwwroot/ISB/data/parameters/isb_default_input_kscore.xml</note>

<note> FILE LOCATIONS. Replace them with your input (.mzXML) file and output file -- these are REQUIRED.
Optionally a log file and a sequence output file of all protein sequences identified in the first-pass can be specified.
Use of FULL path (not relative) paths is recommended. </note>
	<note type="input" label="output, log path"></note>
	<note type="input" label="output, sequence path"></note>

<note> TAXONOMY FILE. This is a file containing references to the sequence databases. Point it to your own taxonomy.xml if needed.</note>

<note> PROTEIN SEQUENCE DATABASE. This refers to identifiers in the taxomony.xml, not the .fasta files themselves!
Make sure the database you want is present as an entry in the taxonomy.xml referenced above. This is REQUIRED. </note>

<note> PRECURSOR MASS TOLERANCES. In the example below, a -2.0 Da to 4.0 Da (monoisotopic mass) window is searched for
peptide candidates. Since this is monoisotopic mass, so for non-accurate-mass instruments, for which the precursor is
often taken nearer to the isotopically averaged mass, an asymmetric tolerance (-2.0 Da to 4.0 Da) is preferable. This
somewhat imitates a (-3.0 Da to 3.0 Da) window for averaged mass (but not exactly)</note>
 	<note type="input" label="spectrum, parent monoisotopic mass error minus">2.0</note>
 	<note type="input" label="spectrum, parent monoisotopic mass error plus">4.0</note>
	<note type="input" label="spectrum, parent monoisotopic mass error units">Daltons</note>
<note>The value for this parameter may be 'Daltons' or 'ppm': all other values are ignored</note>
	<note type="input" label="spectrum, parent monoisotopic mass isotope error">no</note>
<note>This allows peptide candidates in windows around -1 Da and -2 Da from the acquired mass to be considered.
Only applicable when the minus/plus window above is set to less than 0.5 Da. Good for accurate-mass instruments
for which the reported precursor mass is not corrected to the monoisotopic mass. </note>

<note> MODIFICATIONS. In the example below, there is a static (carbamidomethyl) modification on C, and variable modifications
on M (oxidation). Multiple modifications can be separated by commas, as in "80.0@S,80.0@T". Peptide terminal modifications
can be specified with the symbol '[' for N-terminus and ']' for C-terminus, such as 42.0@[ .  </note>

 	<note type="input" label="residue, modification mass">442.2000@C</note>
 	<note type="input" label="residue, potential modification mass">8.0@C,16.0@M</note>
	<note type="input" label="residue, potential modification motif"></note>
		<note> You can specify a variable modification only when present in a motif. For instance, 0.998@N!{P}[ST] is
a deamidation modification on N only if it is present in an N[any but P][S or T] motif (N-glycosite). </note>
	<note type="input" label="protein, N-terminal residue modification mass"></note>
 	<note type="input" label="protein, C-terminal residue modification mass"></note>
<note> These are *static* modifications on the PROTEINS' N or C-termini. </note>

<note> SEMI-TRYPTICS AND MISSED CLEAVAGES. In the example below, semitryptic peptides are allowed, and up to
2 missed cleavages are allowed. </note>
 	<note type="input" label="protein, cleavage semi">yes</note>
	<note type="input" label="scoring, maximum missed cleavage sites">2</note>

<note> REFINEMENT. Do not use unless you know what you are doing. Set "refine" to "yes" and specify what you want to search
in the refinement. For non-confusing results, repeat the same modifications you set above for the first-pass here.</note>
	<note type="input" label="refine">yes</note>
	<note type="input" label="refine, maximum valid expectation value">0.1</note>
 	<note type="input" label="refine, modification mass">442.2000@C</note>
	<note type="input" label="refine, potential modification mass">8.0@C,16.0@M</note>
	<note type="input" label="refine, potential modification motif"></note>
 	<note type="input" label="refine, cleavage semi">yes</note>
	<note type="input" label="refine, unanticipated cleavage">no</note>
	<note type="input" label="refine, potential N-terminus modifications"></note>
	<note type="input" label="refine, potential C-terminus modifications"></note>
	<note type="input" label="refine, point mutations">no</note>
	<note type="input" label="refine, use potential modifications for full refinement">no</note>
</bioml>
Starting the X!Tandem search
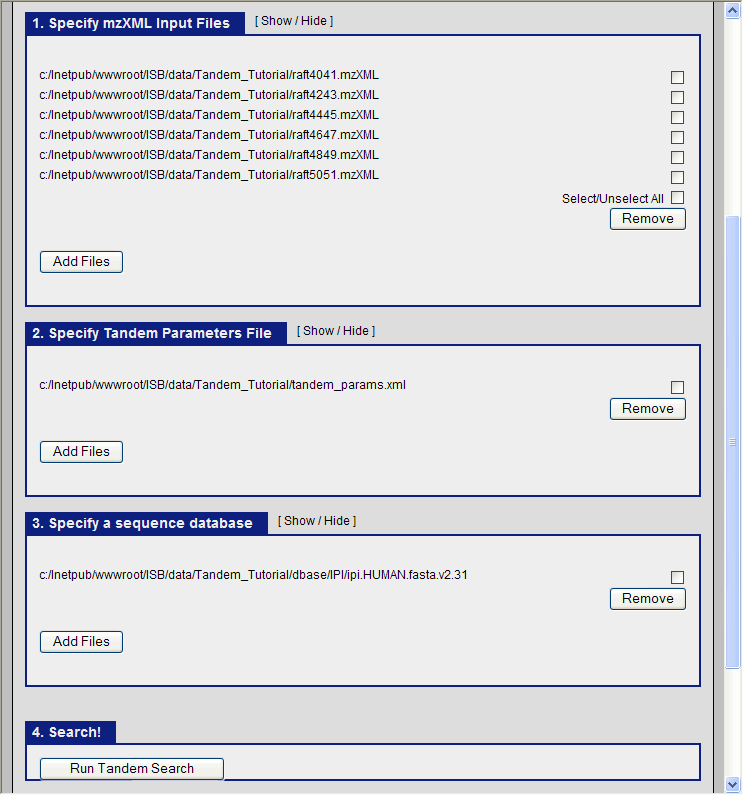
It only remains to specify the three items for the X!Tandem search to begin:
- The mzXML files containing the ms data.
- The tandem parameter file which we just created (tandem_params.xml)
- The database file
In the TPP graphical interface, choose the following:
- navigate to the directory C:\Inetpub\wwwroot\ISB\data\Tandem_Tutorial and select the six mzXML files.
- select the file C:\Inetpub\wwwroot\ISB\data\Tandem_Tutorial\tandem_params.xml as our parameter file.
- select the file C:\Inetpub\wwwroot\ISB\data\Tandem_Tutorial\dbase\IPI\ipi.HUMAN.fasta.v2.31 as the database.
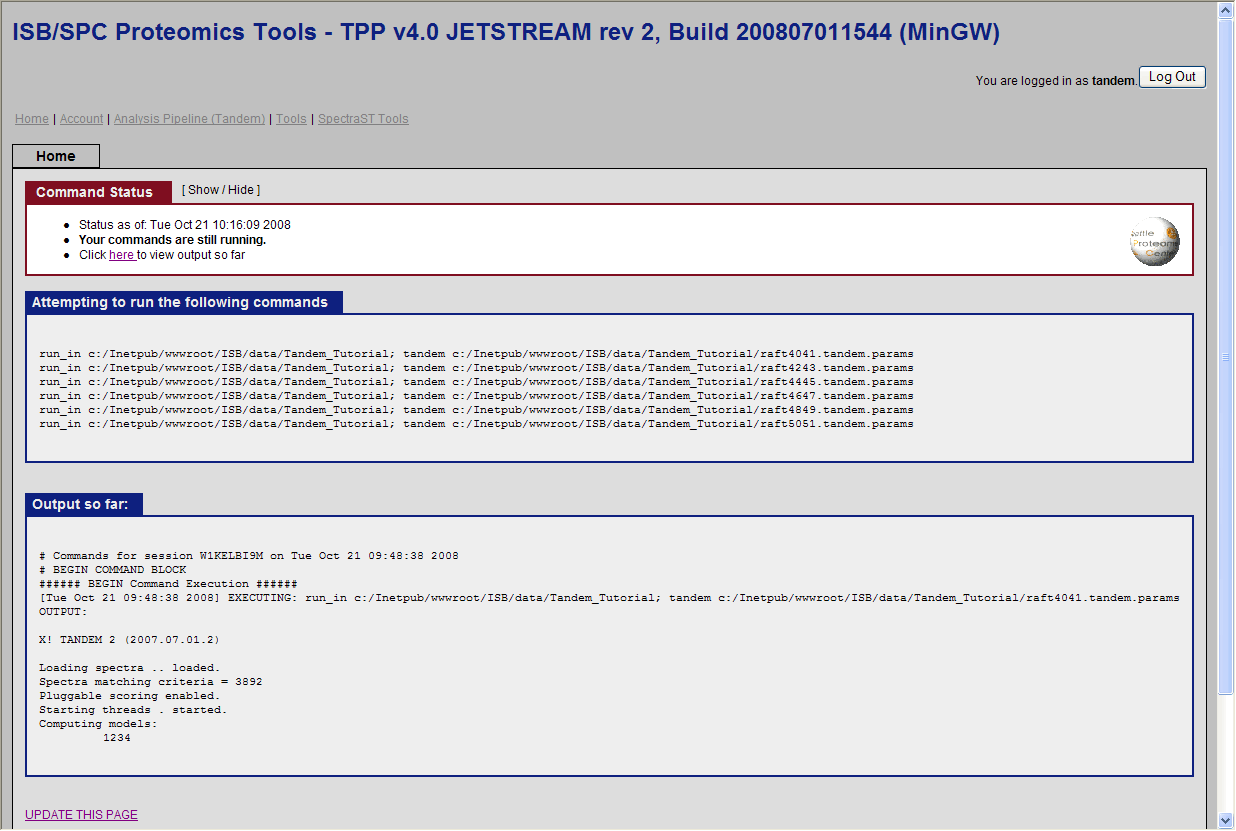
and click run Tandem. You should see the search running:
Note: This could take several hours on a normal desktop machine. You can click on update this page below to view the progress.
Running Tandem2XML
When the search is completed, you should see six tandem output files in the Tandem_Tutorial directory: raft4041.tandem, raft4243.tandem, raft4445.tandem, raft4647.tandem, raft4849.tandem, raft5051.tandem.
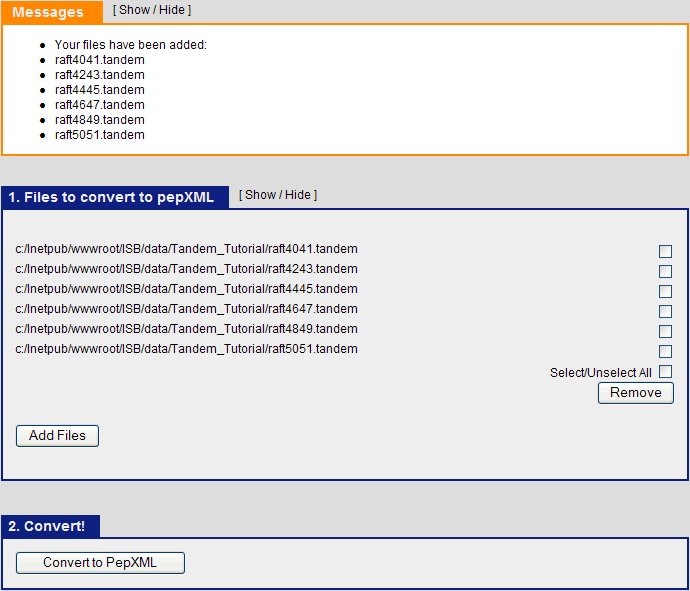
The next step is to use Tandem2XML to convert the tandem output files to .pep.xml files. Click on the “Analysis Pipeline (Tandem)” and the “pepXML” tab. Under “Files to convert to pepXML”, click “Add Files” and select the six .tandem files from the Tandem_tutorial directory.
After this is done, Click “Convert to PepXML” at the bottom.
Once the commands have finish executing, click on “view results and output files”. This should show the 6 pepXML files that were created from the command Tandem2XML.
PepXML Viewer
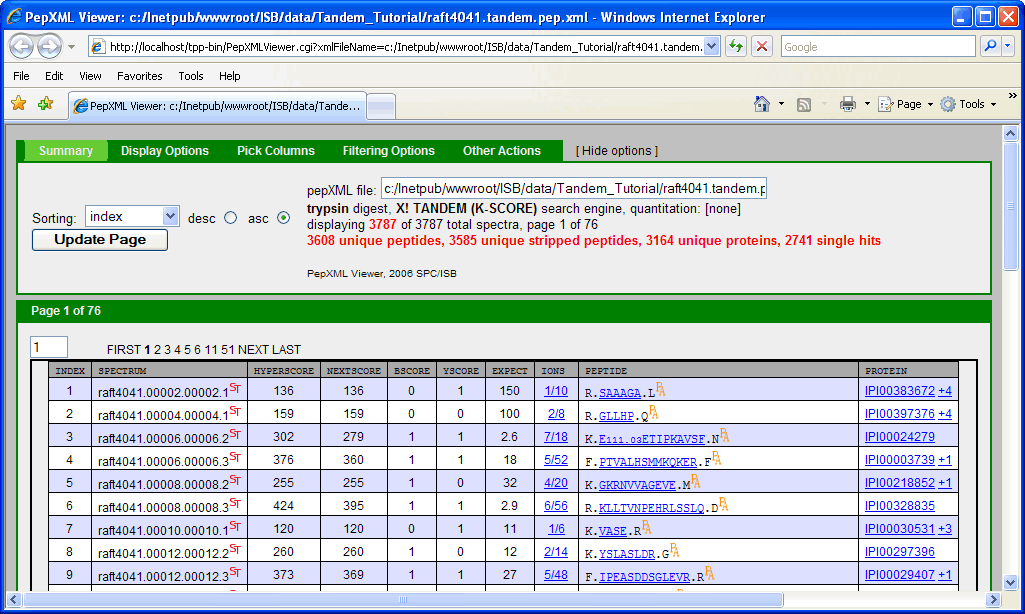
clicking on the “PepXML” next to raft4041.tandem.pep.xml will bring up the PepXML Viewer.
NOTE: This window can also be accessed by typing the following link in your web browser http://localhost/tpp-bin/PepXMLViewer.cgi?xmlFileName=c:/Inetpub/wwwroot/ISB/data/Tandem_Tutorial/raft4041.tandem.pep.xml.
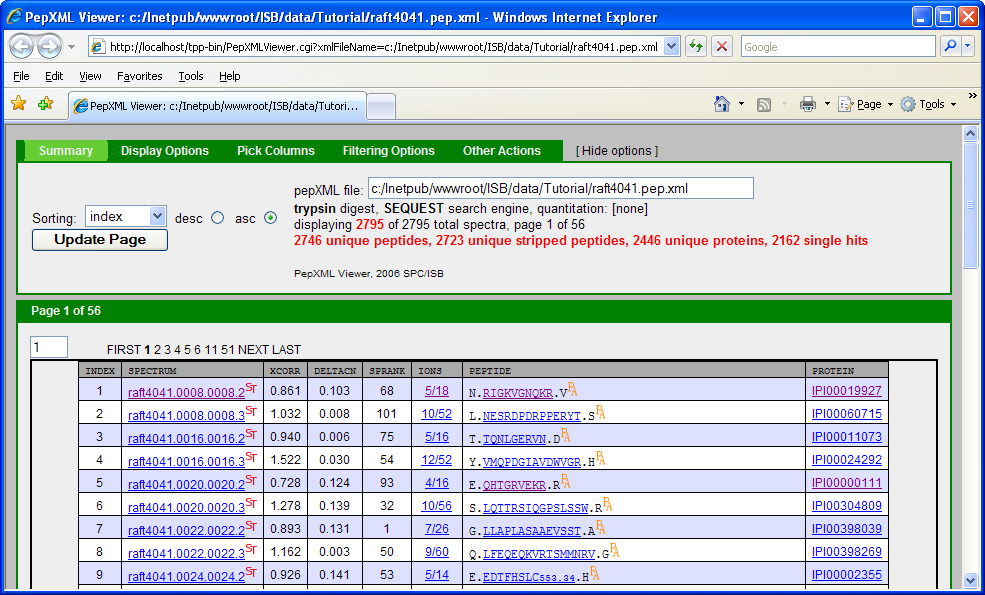
If you have gone through the other TPP Tutorial (PepXML Viewer section), you might notice that some of the columns are different (shown below).
This is because the search was done using the Sequest search engine which describes how well a peptide matches to a spectrum using scores: XCorr, DeltaCN, SPRank, Ions. Tandem search engine uses a different scoring function: Hyperscore, Nextscore, BScore, YScore, Expect, Ions. If you scrutinize the 2 pepXML viewer window, you might discover that the spectrum raft4041.008.008.2 matches to a different peptide and corresponding protein in the X!Tandem and Sequest result. A general “problem” is that different search engines can return different results from the same spectrum, and one needs a way to differentiate incorrect matches from correct matches. Traditionally, this has been done be defining a filtering criteria (or thresholding), e.g. accept results as “correct” if XCorr ≥ 2, deltaCN ≥ 0.1, Sprank ≥ 50. One problem with this is that the appropriate threshold may depend on the database, mass spectrometer instrument, samples, etc. It is also difficult to compare results across different search engines.
PeptideProphet uses a statistical approach to filter incorrect matches from correct matches. It uses search scores and properties of the assigned peptides to compute a probability that each search result is correct. Read more about it here: [1]
Peptide Level Analysis
After successfully converted your data to the pepXML format, the next step is to do a peptide level analysis where you would return to the TPP GUI and select the ‘Analyze Peptides’ from under the 'Analysis Pipeline (Sequest)' link. The subsequent analysis is covered in the TPP tutorial and will not be repeated here. Following the TPP tutorial would run you through the tools XPress, ASAPRatio to perform quantitation for the ICAT data we are using and ProteinProphet which will assign statistical confidence to the proteins identified.
Summary
In summary, this tutorial has discuss the steps to perform a X!Tandem search of ms data (in mzXML) format using the graphical interface in TPP. The X!Tandem output is converted to pepXML format using Tandem2XML in TPP. Subsequent peptide and protein level analysis using PeptideProphet and ProteinProphet can be found in this very useful TPP tutorial.
The links below contains useful information related to this tutorial.
Other pages containing useful information
- Installing TPP
- A list of software that TPP integrates
- converters to mzXML (an open data format for storage and exchange of mass spectroscopy data)
- TPP related tools
- Using Petunia (which is the graphical interface of TPP)
- TPP:X!Tandem and the TPP
- Example data analysis in TPP
- A very comprehensive tutorial on using TPP to analyzed results from a database search
